09 - TF2
Robotics I
Poznan University of Technology, Institute of Robotics and Machine Intelligence
![]()
Laboratory 9 - TF2
Goals
By the end of this lab you will:
- Understand the TF2 framework.
- Implement static and dynamic transform broadcasters.
- Learn about quaternions and their role in representing rotations.
- Build a dummy robotic arm with multiple joints and frames.
Resources
Note: All code must run inside Docker container.
Preparation
- Pull the latest version of the ROS2 Jazzy Docker image:
docker pull osrf/ros:jazzy-desktop- Run the Docker container with the following script.: >
Note: Make sure to replace
CONTAINER_NAMEwith your student ID number.
  IMAGE_NAME="osrf/ros:jazzy-desktop"
  CONTAINER_NAME="" # student ID number

  xhost +local:root

  XAUTH=/tmp/.docker.xauth
  if [ ! -f $XAUTH ]
  then
      xauth_list=$(xauth nlist :0 | sed -e 's/^..../ffff/')
      if [ ! -z "$xauth_list" ]
      then
          echo $xauth_list | xauth -f $XAUTH nmerge -
      else
          touch $XAUTH
      fi
      chmod a+r $XAUTH
  fi

  docker stop $CONTAINER_NAME || true && docker rm $CONTAINER_NAME || true

  docker run -it \
      --env="DISPLAY=$DISPLAY" \
      --env="QT_X11_NO_MITSHM=1" \
      --env="ROS_AUTOMATIC_DISCOVERY_RANGE=LOCALHOST" \
      --env="ROS_LOCALHOST_ONLY=1" \
      --volume="/tmp/.X11-unix:/tmp/.X11-unix:rw" \
      --env="XAUTHORITY=$XAUTH" \
      --volume="$XAUTH:$XAUTH" \
      --privileged \
      --network=host \
      --shm-size=1024m \
      --name="$CONTAINER_NAME" \
      $IMAGE_NAME \
bash- After running the above command, you should be inside the container. Now let’s configure the environment:
apt update
apt install ros-jazzy-tf-transformations python3-pip
echo "source /opt/ros/jazzy/setup.bash" >> ~/.bashrc
mkdir -p ~/ros2_ws/src
cd ~/ros2_ws
colcon build
source ~/ros2_ws/install/setup.bash
echo "source ~/ros2_ws/install/setup.bash" >> ~/.bashrc
pip install transforms3d
Note: If the pip install command fails (especially
in Ubuntu 24.04), add the --break-system-packages flag to
the command above.
Tip: You can use
colcon build --symlink-installto create symbolic links to the source files instead of copying them. This way, you can edit the source files directly in thesrcdirectory without needing to rebuild the entire workspace.
TF2 Overview
TF2 manages coordinate frames and keeps track of their relationships over time. It allows different parts of a robot to understand their positions relative to each other.
Key Concepts:
Frames: Coordinate systems attached to different parts of a robot.
Transformations: Relationships between frames, including translation and rotation.
Tree Structure: TF2 maintains a tree of frames with a single root.
Source:
accelerationrobotics.com
Static and Dynamic Transforms
Static transforms are fixed relationships between frames, while dynamic transforms change over time. TF2 allows you to broadcast both types of transforms. Static transforms are typically used for fixed parts of a robot, while dynamic transforms are used for moving parts.
Task 1: Static Transform Publisher
- Open a terminal and run the following command to start a static transform publisher:
ros2 run tf2_ros static_transform_publisher 1 0 0 0 0 0 /map /base_linkThis command creates a static transform between the /map
and /base_link frames. The parameters represent the
translation (x, y, z) and rotation (roll, pitch, yaw) in radians.
- Open a new terminal and run the following command to visualize the static transform:
rviz2In RViz, add a “TF” display type to visualize the frames. You should see the
/mapand/base_linkframes. It’s good idea to check the “Show Names” option to see the names of the frames.You can also visualize the static transform using the
tf2_echocommand:
ros2 run tf2_ros tf2_echo map base_linkThis command will display the translation and rotation between the two frames.
Task 2: Dynamic Transform Publisher
- Create new Python package:
cd ~/ros2_ws/src
ros2 pkg create --build-type ament_python --node-name dynamic_tf_publisher dynamic_tf_publisher- Open the
dynamic_tf_publisherdirectory and edit thedynamic_tf_publisher.pyfile. Add the following code to create a dynamic transform broadcaster:
import rclpy
from rclpy.node import Node
from geometry_msgs.msg import TransformStamped
from tf2_ros import TransformBroadcaster
import math

class DynamicFramePublisher(Node):
    def __init__(self):
        super().__init__('dynamic_frame_publisher')
        self.broadcaster = TransformBroadcaster(self)
        self.timer = self.create_timer(0.1, self.broadcast_transform)
        self.angle = 0.0

    def broadcast_transform(self):
        t = TransformStamped()
        t.header.stamp = self.get_clock().now().to_msg()
        t.header.frame_id = 'map'
        t.child_frame_id = 'moving_frame'
        t.transform.translation.x = math.cos(self.angle)
        t.transform.translation.y = math.sin(self.angle)
        t.transform.translation.z = 0.0
        t.transform.rotation.x = 0.0
        t.transform.rotation.y = 0.0
        t.transform.rotation.z = 0.0
        t.transform.rotation.w = 1.0
        self.broadcaster.sendTransform(t)
        self.angle += 0.1

def main():
    rclpy.init()
    node = DynamicFramePublisher()
    rclpy.spin(node)
    rclpy.shutdown()

if __name__ == '__main__':
main()- Build the package (usage of
--symlink-installflag forcolcon buildis recommended):
cd ~/ros2_ws
colcon build --symlink-install
source ~/ros2_ws/install/setup.bash- Run the dynamic transform publisher:
ros2 run dynamic_tf_publisher dynamic_tf_publisher- Preview the dynamic transform in
RViz.
Quaternions
What Are Quaternions?
Quaternions are a mathematical construct that extends complex numbers. In the context of 3D rotations, a quaternion comprises four components: (x, y, z, w). These components encode both the axis of rotation and the angle of rotation, allowing for smooth and continuous rotational transformations without the singularities or ambiguities associated with Euler angles.
In ROS 2, quaternions are the standard for representing orientations and rotations because:
No Gimbal Lock: Unlike Euler angles, quaternions do not suffer from gimbal lock, a condition where the orientation becomes undefined.
Efficient Interpolation: Quaternions allow for smooth interpolation between orientations, which is crucial for motion planning and control.
Compact Representation: With only four components, quaternions provide a more compact representation than rotation matrices.
Task 3: Quaternion Rotation
- Modify the
broadcast_transformmethod in thedynamic_tf_publisher.pyfile to include quaternion rotation. Replace the existing rotation code with the following:
        angle = self.angle
        t.transform.rotation.x = 0.0
        t.transform.rotation.y = 0.0
        t.transform.rotation.z = math.sin(angle / 2)
        t.transform.rotation.w = math.cos(angle / 2)
This code uses the quaternion representation to rotate the
moving_frame around the z-axis. The angle of rotation is
determined by the self.angle variable, which is updated in
each timer callback.
- Rebuild the package (no need if you used
--symlink-install):
cd ~/ros2_ws
colcon build
source ~/ros2_ws/install/setup.bash- Run the dynamic transform publisher again:
ros2 run dynamic_tf_publisher dynamic_tf_publisher- Open RViz and visualize the
moving_framewith the updated quaternion rotation. You should see the frame rotating smoothly around the z-axis.
Task 4: Euler Angles to Quaternion Conversion
- Modify the
broadcast_transformmethod in thedynamic_tf_publisher.pyfile to include Euler angles to quaternion conversion. Use the functiontf_transformations.quaternion_from_eulerto convert Euler angles to quaternions. Replace the existing rotation code with the following:
        roll = 0.0
        pitch = 0.0
        yaw = self.angle
        q = tf_transformations.quaternion_from_euler(roll, pitch, yaw)
        t.transform.rotation.x = q[0]
        t.transform.rotation.y = q[1]
        t.transform.rotation.z = q[2]
        t.transform.rotation.w = q[3]
Remember to import the tf_transformations module at the
beginning of the file:
import tf_transformations- Rebuild the package (no need if you used
--symlink-install):
cd ~/ros2_ws
colcon build
source ~/ros2_ws/install/setup.bash- Run the dynamic transform publisher again:
ros2 run dynamic_tf_publisher dynamic_tf_publisherOpen RViz and visualize the
moving_framewith the updated Euler angles to quaternion conversion. You should see the frame rotating smoothly around the z-axis.Play with the angles to see how the frame rotates. You can change the
roll,pitch, andyawvalues to see how they affect the rotation of the frame.
Visualizing TF2 using
view_frames
- Run the dynamic transform publisher:
ros2 run dynamic_tf_publisher dynamic_tf_publisher- Run the
view_framescommand to visualize the TF2 frames:
ros2 run tf2_tools view_framesThis command will generate a PDF file named frames.pdf
in the current directory. Open the PDF file to see the visualization of
the TF2 frames. To do it you can copy the file to your local machine
using docker cp command:
docker cp <container_id>:<path_to_frames>/frames.pdf .Final Task: Dummy Robotic Arm
- Create a new package for the dummy robotic arm:
cd ~/ros2_ws/src
ros2 pkg create --build-type ament_python --node-name dummy_arm dummy_arm- Open the
dummy_armdirectory and edit thedummy_arm.pyfile. Create a dummy robotic arm with multiple joints. The arm should consist of joints that rotate around the z-axis. The arm will be represented as a series of frames connected by dynamic transforms. The structure of the arm should be as follows:
map
└── base_link
    ├── joint_1
    │   └── joint_2
    │       └── joint_3
    │           └── end_effector
The joints should move to simulate “waving” motion. The end effector should be a simple frame that represents the end of the arm.
Implementation Requirements:
Create a node that publishes dynamic transforms for all joints of the arm Joint dimensions and parameters:
base_link: Fixed to the map (static transform)
joint_1: 0.3m high from base_link, rotating around z-axis
joint_2: 0.4m from joint_1 along the x-axis, rotating around z-axis
joint_3: 0.3m from joint_2 along the x-axis, rotating around z-axis
end_effector: 0.2m from joint_3 along the x-axis
Movement Pattern:
Each joint should rotate with different speeds:
joint_1: Slow rotation (e.g., 0.3 rad/sec)
joint_2: Medium rotation (e.g., 0.5 rad/sec)
joint_3: Fast rotation (e.g., 0.7 rad/sec)
The joints should have limited rotation ranges to simulate realistic joint constraints:
joint_1: ±45 degrees (±π/4 radians)
joint_2: ±30 degrees (±π/6 radians)
joint_3: ±60 degrees (±π/3 radians)
This means that the joints should not rotate beyond these limits, but should oscillate within these ranges.
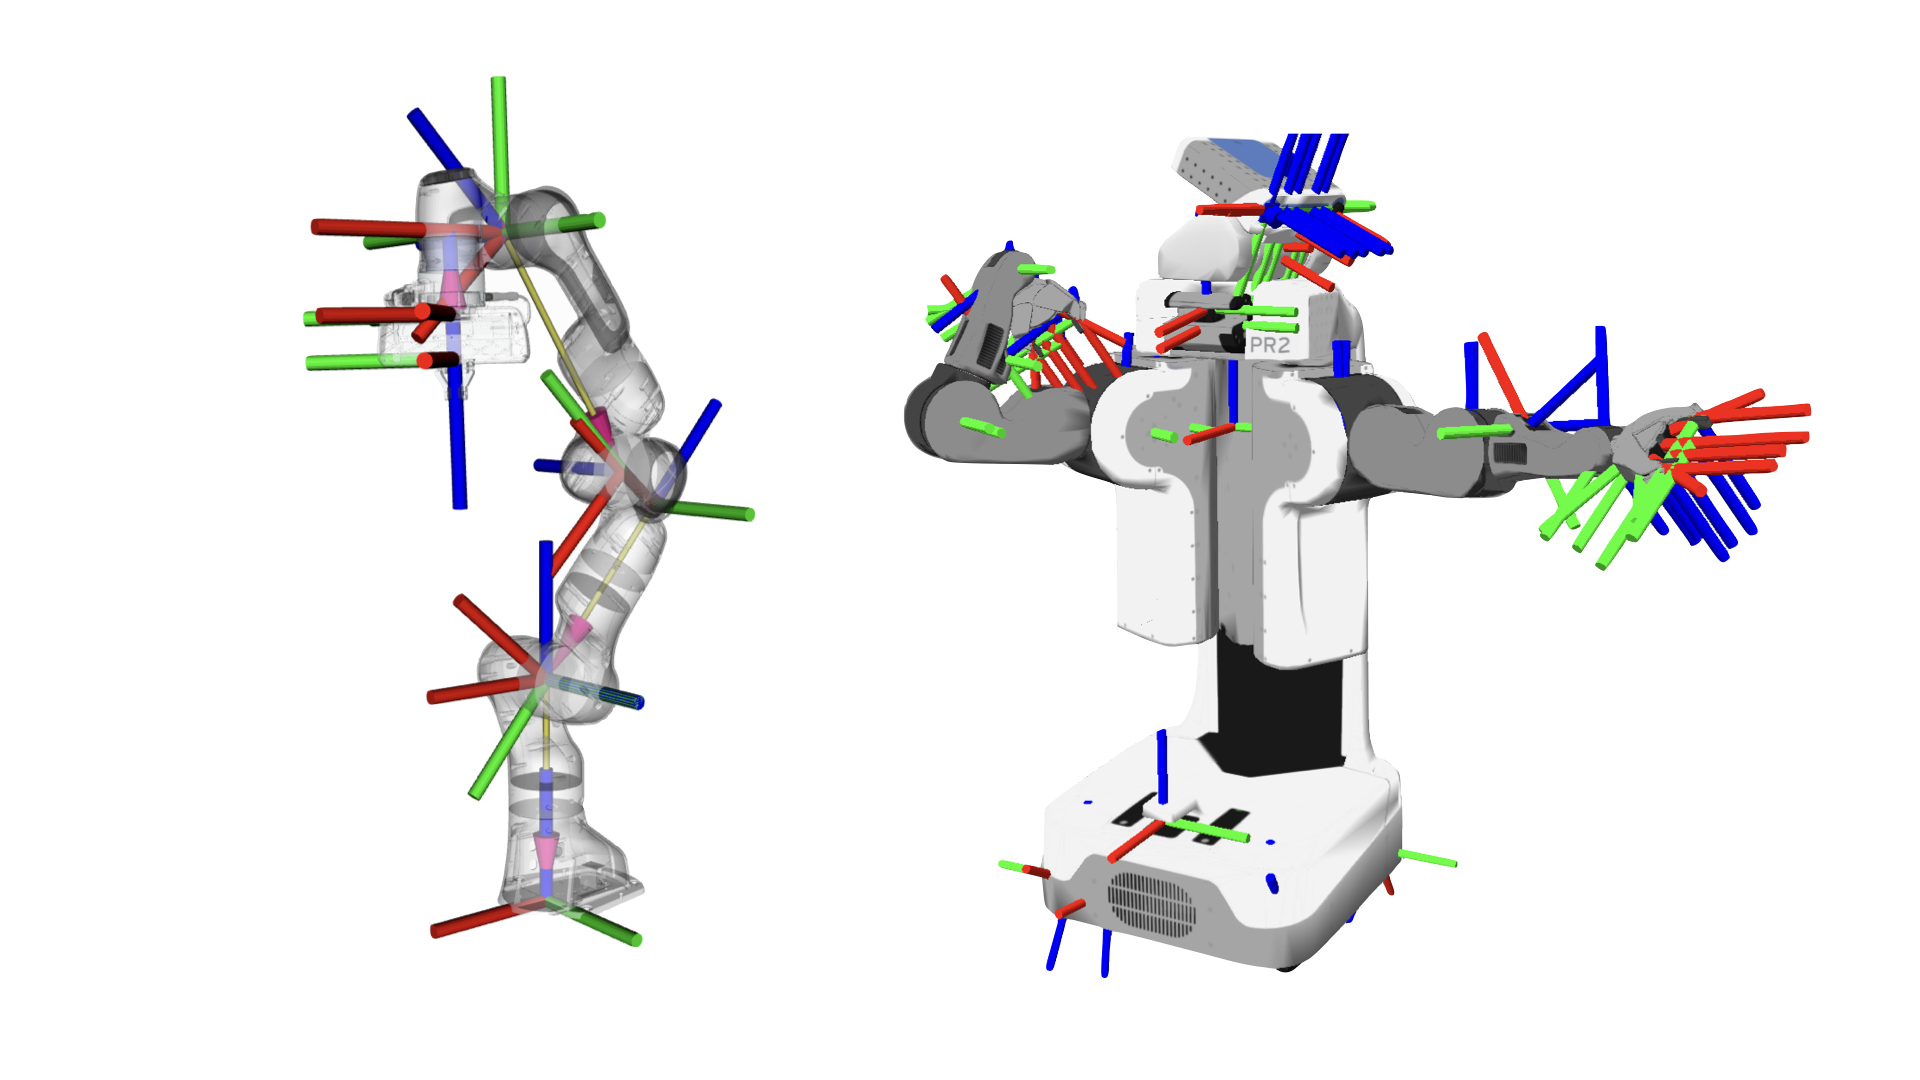
Implement sine wave motion to create a smooth “waving” effect. The final result should look like this:
Source: Own material
💥 💥 💥 Assignment 💥 💥 💥
To pass the course, you need to upload the following file to the eKursy platform:
dummy_arm.pyfile with the code for the dummy robotic arm.frames.pdffile with the visualization of the TF2 frames for the dummy robotic arm.